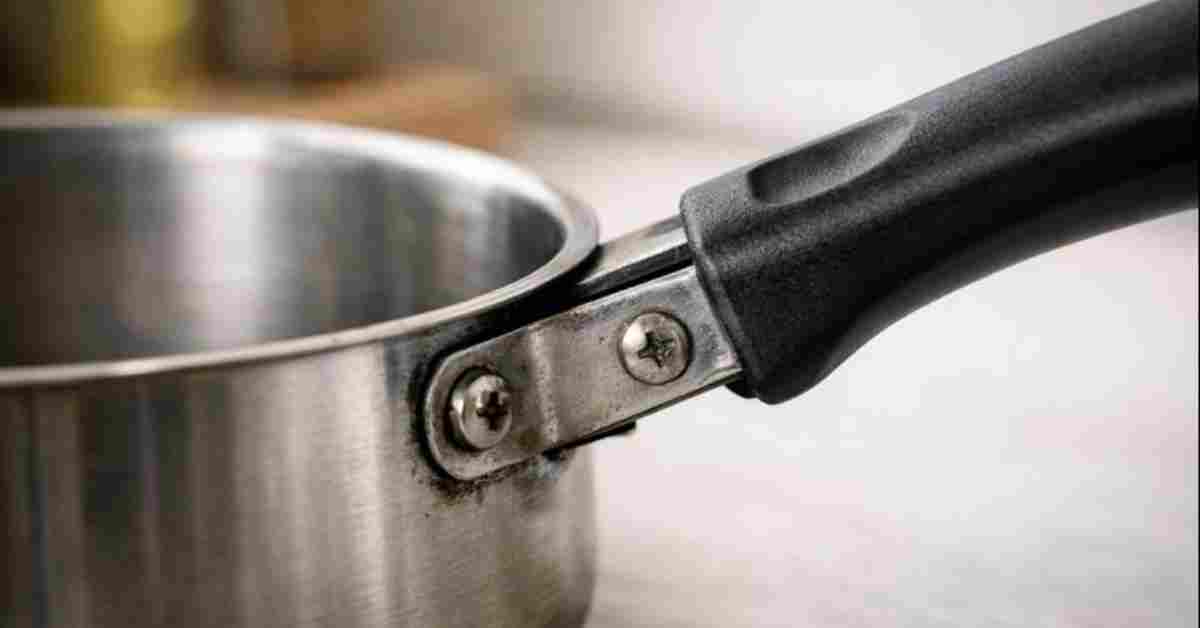
Cookware handles become loose mainly due to repeated heating and cooling, which causes metal expansion and contraction around screws or rivets. Over time, vibrations from daily use and heavy lifting weaken these fasteners, making the handle wobble.
It’s a common kitchen mystery: suddenly, your favorite pan’s handle feels wobbly. This happens to many home cooks, especially when you’re just getting started and figuring things out. Don’t worry, it’s not a sign you’re doing anything wrong!
We’ll break down why cookware handles become loose and then show you a super easy fix. Stick around, and we’ll get your pots and pans feeling sturdy again.
Key Takeaways
- Loose cookware handles are often caused by heat and washing.
- Simple tools can be used to tighten most common handle screws.
- Different cookware materials require slightly different care.
- Preventative measures can help keep handles secure for longer.
- Some handles are designed to be permanently attached and may indicate a deeper issue if loose.
The Science Behind Wobbly Handles
There are a few main reasons Why Cookware Handles Become Loose. Think about how often you use your pots and pans. They go from the stovetop to the sink, maybe into the oven, and are gripped and moved constantly.
This everyday use puts stress on the parts that connect the handle to the pot. Heat is a big player here. When metal gets hot, it expands.
When it cools down, it shrinks. This constant expansion and contraction, especially around the screws or rivets that hold the handle on, can slowly loosen them over time. It’s like a tiny, slow-motion dance of metal parts.
Washing, particularly dishwashers, also contributes. The combination of hot water, detergent, and the jostling inside a dishwasher can further loosen those connections. Even hand washing with a scrub brush can apply pressure that, over many cycles, makes a difference.
It’s not just one big event; it’s a gradual process that happens with normal, expected use.
Heat Expansion and Contraction
Metal has a property called thermal expansion. This means that when it gets warmer, the atoms within the metal vibrate more and spread slightly apart, causing the metal to take up a bit more space. When the metal cools down, the atoms slow down and move closer together, and the metal shrinks back.
For cookware, this happens every time you heat it on the stove or put it in a hot oven. The handle, the pot body, and the connecting hardware all expand and contract, but they might do so at slightly different rates or by different amounts. This differential expansion and contraction creates a constant, tiny movement at the connection points.
Over hundreds of heating and cooling cycles, this movement can cause screws to back out or rivets to loosen their grip.
Imagine a screw going through two pieces of metal. As the metal expands, it might push outwards slightly, creating a tiny gap. As it contracts, it pulls inwards.
If this happens repeatedly, it can effectively “unscrew” the screw bit by bit, or at least weaken the threads’ hold. This is a fundamental physical process that affects almost all metal objects subjected to temperature changes.
Moisture and Detergents
When you wash your cookware, water and soap get into all the small crevices. If your handles are attached with screws, water can seep around the screw threads. Over time, this moisture can interfere with the friction that holds the screw in place.
Some detergents, especially those used in dishwashers, are quite strong. They can act as lubricants, further reducing friction and making it easier for screws to loosen. Plus, the high heat and vigorous spraying in a dishwasher can add mechanical stress on top of the chemical and thermal stresses.
For cookware made with certain materials, like some types of wood or plastic used for handles, moisture can also cause swelling and shrinking, which might also put stress on the attachment points. Stainless steel and aluminum, common for pot bodies, expand and contract significantly with temperature changes. The materials used for handles might behave differently, leading to these stresses.
Mechanical Stress and Wear
Every time you pick up a pot, stir something in it, or move it around, you’re applying force. This mechanical stress, even if it feels minor, adds up. If a handle is slightly loose, this stress can exacerbate the problem, making it wobble more.
Think of it like shaking a loose bolt; the more you shake it, the looser it gets. Over time, repeated handling, stirring, and even the vibrations from cooking can cause wear and tear on the threads or the connection points.
Certain cooking techniques can also create more mechanical stress. For example, aggressively scraping food from the bottom of a pan while holding the handle can put a lot of torque on the connection. Similarly, if a pan is very heavy and you’re lifting it by the handle, that’s a direct application of significant force.
This wear is a natural consequence of using tools for their intended purpose.
Common Causes and Beginner Pitfalls
For someone new to cooking, encountering a loose handle can be confusing. You might wonder if you did something wrong, like overheating the pan or using the wrong cleaning method. The truth is, it’s a common issue that most people run into eventually.
Beginners might not realize the impact of thermal expansion and contraction, or they might not be aware of how often dishwashers can affect handle security. It’s not a failure, but a learning opportunity about how cookware behaves.
Sometimes, the way a beginner grips or handles a pot can also contribute. Maybe they lift a heavy pot solely by the handle without supporting the base, putting extra strain on the connection. Or perhaps they are too aggressive when cleaning around the handle area.
These are all normal parts of learning to cook and use kitchen tools effectively. The good news is that fixing this is usually quite straightforward.
Over-Tightening and Stripped Threads
One pitfall beginners might encounter is trying to fix a loose handle by over-tightening a screw. If a screw is already stripped or the hole it’s in is damaged, simply forcing it tighter can actually make things worse. Stripped threads mean the screw can no longer grip the material it’s screwed into.
It will just spin and spin without getting tighter, and it can damage the hole further, making a proper repair much harder. This is a common mistake when someone tries to force a fix without knowing the exact problem.
It’s also possible that the original attachment was not done perfectly at the factory. Sometimes, screws aren’t seated properly, or the threads in the handle or pot body are weak from the start. If a beginner then tries to tighten it too much, they risk stripping the threads.
It’s important to know when to stop tightening and assess if the screw is actually engaging properly.
Ignoring Early Signs of Looseness
Another common issue, especially for beginners, is ignoring those first few wiggles. A handle might start to feel just a tiny bit loose, and it’s easy to dismiss it as not a big deal. However, that slight looseness is an indicator that the connection is starting to fail.
If left unaddressed, the wiggling will increase, putting more stress on the screw or rivets, and potentially leading to the handle becoming completely detached. It’s like a small leak in a roof; if you ignore it, it can become a much bigger problem.
Catching it early is key. A handle that is just beginning to loosen is usually easy to tighten. If you wait until it’s significantly wobbly, the screw threads might be more worn, or the metal around the attachment point might be stressed.
This makes the fix more difficult and less likely to be permanent.
Washing Machine Mayhem
Putting cookware in the dishwasher might seem convenient, but it can be tough on handles. The high heat, strong detergents, and constant water jets can work their way into the screw holes and around rivets. This moisture can degrade any adhesive or friction material that might have been used to help secure the handle.
The mechanical action of the dishwasher can also vibrate and jiggle the handle, encouraging screws to loosen over time.
Think about it: the handle is being constantly bombarded by water and soap, and then heated to very high temperatures for drying. This environment is much harsher than a quick hand wash. For cookware with wooden handles, dishwashers are a definite no-go, as the wood will warp and crack.
Even for metal handles, the repeated exposure to these conditions can weaken the attachment points.
Fixing Your Wobbly Cookware Handles
The good news is that most loose cookware handles can be fixed at home with just a few basic tools. This isn’t a complicated repair; it’s more about understanding which part needs tightening and using the right tool. We’ll walk through the most common types of handles and how to secure them.
You’ll likely find that a simple screwdriver or a small wrench is all you need to bring your favorite pan back to life and prevent that annoying wobble.
First, identify how your handle is attached. Most commonly, it’s a screw. Some older or heavier cookware might use rivets, which are generally not user-fixable without specialized tools and might indicate a need for professional repair or replacement if they loosen.
But for the vast majority of cases, a screw is the culprit. Cleaning around the handle attachment area is also a good first step. Sometimes, gunk can make it hard to get a good grip or see what you’re doing.
Identifying the Type of Fastener
The first step in fixing a loose handle is to figure out what’s holding it on. For most modern cookware, especially pots and pans with metal or plastic handles, you’ll find a screw. Look closely at the connection point.
You’ll often see the head of a screw, which could be a Phillips head (with a cross shape) or a flathead (with a single slot). Some handles might have a decorative cap or cover that can be gently pried off to reveal the screw underneath.
If you don’t see a screw head, it might be attached with rivets. Rivets are small metal pins that are inserted and then hammered or pressed to expand and hold the handle in place. Riveted handles are generally more permanent and harder to fix at home if they become loose.
However, if you’re dealing with a screw, you’re in luck, as this is usually a simple fix. Some high-end or specialized cookware might use bolts that go all the way through the handle and pot, secured with a nut on the other side, but this is less common for everyday pots and pans.
Screw-On Handles
These are the most common. A screw goes through the handle and into a threaded hole in the pot or pan body, or into a metal plate attached to the pot. When the screw loosens, the handle can move.
The type of screw head will determine the type of screwdriver you need. A Phillips head screwdriver has a pointed, cross-shaped tip that fits into matching slots on the screw. A flathead (or slotted) screwdriver has a flat, wedge-shaped tip that fits into a single slot on the screw.
It’s important to use the correct size and type of screwdriver. Using a screwdriver that’s too small can damage the screw head, making it harder to remove or tighten. If the screw is recessed, you might need a screwdriver with a longer shaft.
Some handles have a screw that is accessible from the underside of the pot lid or the main body.
Riveted Handles
Riveted handles are designed to be very strong and permanent. The rivet is a metal shaft that passes through holes in the handle and the pot body. Once in place, the ends of the shaft are hammered or pressed to create a head on both sides, effectively clamping the handle to the pot.
If a riveted handle becomes loose, it means the rivet itself might be wearing thin, or the holes have enlarged. This is a more challenging repair because you can’t simply unscrew it.
Sometimes, a loose rivet might be due to debris or a slight deformation of the metal. However, significant looseness usually indicates that the rivet’s integrity has been compromised. For most home cooks, if a riveted handle becomes loose, the best option is often to consider replacing the cookware, as repairing rivets typically requires specialized tools and skills to ensure it’s safe and secure.
Tools You’ll Need
Gathering the right tools is step one to a successful repair. For most screw-on handles, you’ll primarily need screwdrivers. Make sure you have a set that includes various sizes and types, especially Phillips and flathead.
Having a magnetic tip can be helpful, as it can hold the screw in place while you work, preventing it from falling into the pot.
If the screw is a bit stubborn or recessed, you might also need a small wrench or pliers. Sometimes, the screw might be a hex screw, requiring an Allen wrench (also known as a hex key). If your cookware handle has a decorative cap that needs to be removed, a small flathead screwdriver or even a butter knife can sometimes be used to gently pry it off.
It’s always a good idea to clean the area around the screw first; a stiff brush can help remove any food debris or grease that might be hindering your work.
Screwdrivers
Screwdrivers are your best friends for this task. You’ll need both Phillips and flathead screwdrivers. For Phillips screws, look for the ones with a cross shape.
For flathead screws, they have a single slot. It’s crucial to match the size of the screwdriver to the screw head. If the screwdriver is too small, it can slip and strip the screw head, making it very difficult to remove or tighten later.
If it’s too large, it won’t fit into the slots properly.
Many sets come with a range of sizes. For cookware handles, you’ll typically need smaller to medium-sized screwdrivers. Some screwdrivers have magnetic tips, which are incredibly helpful for holding onto tiny screws, preventing them from falling into the pan or onto the floor.
Precision screwdriver sets, often used for electronics, can be particularly useful for very small screws found on some cookware.
Wrenches and Pliers
While screwdrivers are primary, sometimes you’ll need a bit more grip or leverage. If the screw head is stripped and a screwdriver won’t grip it, needle-nose pliers can sometimes be used to grab the edge of the screw head and turn it. For screws that are particularly tight or recessed, a socket wrench or an adjustable wrench might be necessary, especially if the screw head has a hexagonal shape or if you need to hold a nut on the other side.
However, be cautious with wrenches and pliers. They can easily damage the screw head or the surrounding handle material if you apply too much force or grip too tightly. Always try a screwdriver first.
If you need to use pliers, grip the screw head firmly but try not to crush it. Adjustable wrenches are handy because they can fit a variety of screw head sizes, but they can also slip easily if not properly adjusted.
Step-by-Step Tightening Process
Once you have your tools ready, it’s time to get to work. First, ensure the cookware is completely cool. Never attempt to tighten a handle on a hot pan; you could burn yourself, and the metal will be expanded, making the tightening less effective when it cools.
Gently clean the area around the loose handle attachment point to remove any debris. This will help you see the screw and ensure a good grip.
Now, identify the type of screw. Insert the appropriate screwdriver into the screw head and turn it clockwise. Turn slowly and steadily.
You’ll feel resistance as the screw tightens. Don’t try to force it; if it feels like it’s not catching or is very stiff, stop. The goal is to make it snug, not to overtighten it, which can strip the threads.
- Cool the Cookware: Make sure the pan or pot is completely cool to the touch before you begin.
- Clean the Area: Use a damp cloth and a soft brush to clean any food particles or grease around the loose handle and its attachment point.
- Identify the Screw Type: Determine if it’s a Phillips head, flathead, or other type of screw.
- Select the Right Tool: Choose a screwdriver that perfectly fits the screw head.
- Insert and Turn: Place the screwdriver tip firmly into the screw head. Turn clockwise, applying steady, gentle pressure.
- Tighten Snugly: Continue turning until the handle feels secure. Stop when you feel firm resistance; do not force it.
- Test the Handle: Gently wiggle the handle to ensure it’s no longer loose.
If the screw spins freely and doesn’t tighten, the threads might be stripped. In this case, you might need to consider a more permanent repair, such as using a screw thread repair kit or seeking professional help. But for most common looseness, a simple clockwise turn will do the trick.
For Screw-On Handles
For screw-on handles, the process is usually quite straightforward. Locate the screw head. If it’s a Phillips head, use a Phillips screwdriver.
If it’s a flathead, use a flathead screwdriver. Ensure the screwdriver fits snugly into the screw head. Begin turning the screw clockwise.
You’ll feel it catching and tightening. Continue turning until the handle feels firm and doesn’t wobble. It’s important to stop when you feel solid resistance to avoid stripping the threads.
Sometimes, the screw might be hidden under a decorative cap. These caps can often be gently pried off with a thin, flat object like a butter knife or a small flathead screwdriver. Once the cap is removed, you’ll expose the screw underneath.
After tightening, you can often pop the cap back on, or if it’s damaged, you might have to live without it or find a replacement. If the screw head itself is worn or damaged, it might be difficult to get a good grip. In such cases, try a slightly larger or smaller screwdriver to see if it can catch an edge, or consider using pliers carefully.
When Screws Won’t Tighten
If you’re turning the screw clockwise and it just keeps spinning without getting tighter, you’ve likely encountered stripped threads. This means the screw can no longer grip the metal it’s supposed to be screwing into. This can happen if the screw was over-tightened previously, or if the threads in the pot or handle are worn out.
There are a few options here.
One temporary fix for stripped threads is to use a bit of thread-locking compound, like Loctite, which can help secure the screw. Another common method is to use a slightly larger screw of the same type, if one is available and fits without damaging the surrounding material. For a more permanent fix, especially if the threads in the pot body are stripped, you might need to use a screw thread repair kit, which often involves drilling out the hole and installing a new, larger thread insert.
Materials and Handle Types
The material of your cookware and handle can influence how it reacts to heat, washing, and tightening. For instance, stainless steel pots are durable but can expand and contract significantly. Pans with cast iron handles are heavy and can also be subject to expansion.
Bakelite or silicone handles on stainless steel pots offer insulation but can sometimes be more prone to loosening if the underlying screw connection isn’t robust. Understanding the material helps in knowing how to care for it.
Different types of handles, like hollow stainless steel, solid stainless steel, or those with silicone grips, have different attachment methods. Hollow handles might be welded or screwed on, while solid handles are often more integrated. Silicone grips, while comfortable, can sometimes shift if the attachment point underneath becomes loose.
It’s worth noting the material and design of your specific cookware.
Stainless Steel Cookware
Stainless steel is a popular choice for pots and pans due to its durability and resistance to rust and corrosion. However, it’s also a metal that expands and contracts noticeably with temperature changes. This means the screws or rivets attaching handles to stainless steel pots are constantly subjected to these forces.
Over time, this thermal cycling can contribute to loosening. When tightening a screw on stainless steel cookware, you want to ensure it’s snug, but avoid excessive force, as this could strip the threads in the steel itself or the screw.
For stainless steel pots with welded handles, the handle is a single piece of metal attached directly to the pot body. If this becomes loose, it’s a more serious structural issue that usually can’t be fixed at home. However, most stainless steel cookware uses handles attached with screws or rivets, which are generally repairable.
Cast Iron Cookware
Cast iron cookware, especially skillets, often features handles that are cast as part of the pan itself or are bolted on with very sturdy screws. Handles cast directly into the pan are generally not prone to loosening. However, if there are bolts attaching a separate handle, they are typically large and robust.
The tightening process for cast iron handles is similar to other metals, but the sheer weight of cast iron means that a loose handle can pose a greater safety risk. Ensure any bolts are securely tightened, but again, avoid over-tightening and stripping the threads in the thick cast iron.
Because cast iron retains heat exceptionally well, the thermal expansion and contraction cycles can be quite significant. This makes regular checks of handle tightness a good idea, especially for older pieces. The rough surface of cast iron can sometimes make it harder to get a precise grip on screws or bolts.
Aluminum and Non-Stick Pans
Aluminum, often used in the base of non-stick pans for good heat conductivity, also expands and contracts with heat. Non-stick pans typically have handles made of plastic, silicone, or wood, attached with screws. The primary concern with these is ensuring the screw doesn’t damage the non-stick coating or the underlying aluminum.
When tightening, be mindful of the material of the handle itself. If it’s plastic, excessive force could crack or deform it. Wood handles, as mentioned, are best kept away from dishwashers and excessive moisture, which can cause them to swell and shrink, loosening attachments.
Some non-stick pans have handles that are attached using a method that doesn’t involve a visible screw on the outside. These might be press-fitted or bonded. If such a handle becomes loose, it’s often not repairable at home and may signal the end of the pan’s life.
However, many have standard screw attachments, making them easy to fix.
Preventative Measures for Secure Handles
Keeping your cookware handles secure long-term is easier than you might think. It’s all about being mindful of how you use and care for your pots and pans. Simple habits can make a big difference in preventing those annoying wobbles and ensuring your cookware remains reliable and safe to use.
Think of it as routine maintenance for your kitchen tools, just like tuning up a car.
Paying attention to cleaning methods is key. While dishwashers are convenient, they can be harsh on cookware. Hand washing, especially for higher-quality or older pieces, can extend their life and keep handles tight.
Also, being gentle when stirring or lifting heavy pans can reduce unnecessary strain on the handle attachments.
Proper Washing Techniques
Hand washing your cookware is generally the best way to preserve the integrity of handle attachments. Use warm, soapy water and a soft sponge or cloth. Avoid abrasive scrubbers, especially on non-stick surfaces or around delicate handle materials like wood.
When washing around screw-on handles, be sure to dry them thoroughly afterwards, paying attention to the area where the handle meets the pot. This helps prevent moisture from seeping into the screw threads and causing them to loosen over time.
If you absolutely must use a dishwasher, try to place your cookware strategically so that the handles are not constantly blasted by water jets or directly exposed to the heating element during the drying cycle. Consider using a “gentle” or “eco” cycle if your dishwasher has one. For cookware with wooden handles, it is critical to hand wash and dry them immediately, as dishwashers will quickly ruin them.
Hand Washing Best Practices
To hand wash effectively, start by letting the cookware cool down. Then, fill the pot or pan with warm water and a little dish soap. Let it soak for a few minutes to loosen food particles.
Use a soft sponge or cloth to clean the interior and exterior. Pay special attention to the handle and the area where it attaches to the pot. After cleaning, rinse thoroughly with clean water.
Finally, dry the cookware immediately with a soft towel, making sure to dry around the handle attachment points.
This immediate drying is crucial. It removes any residual moisture that could, over time, work its way into screw threads or around rivets. For handles made of materials like wood or certain plastics, this prevents them from absorbing moisture, swelling, and then shrinking, which can stress the attachment points.
A quick wipe-down is a simple step that pays off in the long run.
Dishwasher Considerations
While not ideal for all cookware, if you choose to use a dishwasher, be aware of the potential risks to handles. The high temperatures, strong detergents, and forceful water spray can contribute to loosening. If your cookware is labeled as dishwasher-safe, it’s designed to withstand these conditions to a certain extent.
However, even then, longevity of the handle attachment might be reduced compared to hand washing.
Consider placing items with screw-on handles so they don’t get their handles directly hit by the spray arms. Also, be mindful of the drying cycle. Very high heat can sometimes cause materials to expand excessively.
If your cookware has wooden or certain types of plastic handles, avoid the dishwasher entirely, as these materials are often not designed to withstand such harsh conditions and can warp, crack, or deteriorate quickly.
Storage and Handling Tips
How you store your cookware can also affect its handles. Avoid stacking heavy pots on top of lighter ones in a way that puts undue pressure on the handles. If possible, store pans individually or use protective liners between them.
When lifting or carrying pots, especially those with hot contents, always try to support the base of the pan with your other hand in addition to holding the handle. This distributes the weight and reduces the stress on the handle attachment point.
When stirring or cooking, use utensils that are appropriate for your cookware. Avoid using metal utensils on non-stick surfaces, as this can scratch the coating and potentially damage the handle attachment point if you’re being too aggressive. Being mindful of these small details can help ensure your cookware remains in good condition for years to come.
Smart Storage Solutions
To prevent handles from becoming loose or damaged during storage, thoughtful stacking is important. If you stack pots and pans, use pan protectors or soft cloths between them. This not only prevents scratches but also prevents handles from digging into the surface of the pan below.
For deep pots or Dutch ovens, consider storing them on shelves where they don’t need to be stacked. If you have hanging racks, utilize them for pots and pans, as this takes the pressure off the handles entirely.
Avoid storing cookware in areas where they might get bumped or knocked around frequently. This accidental physical stress can put subtle pressure on handle attachments, contributing to loosening over time. Keeping them organized and secure in your cabinets or on your racks is a simple but effective way to maintain their condition.
Gentle Handling During Use
During cooking, a little gentleness goes a long way. When stirring or scraping, avoid applying excessive force to the handle. If you’re using a heavy pot, like a Dutch oven filled with stew, always support the bottom of the pot with your other hand or a folded towel while lifting and moving it.
This significantly reduces the leverage and stress placed on the handle and its attachment. Never bang utensils against the edge of the pan or use the handle to leverage movement.
For pans with shallower handles, be extra careful about how you grip them. Some handles are designed for specific lifting techniques. If a handle feels awkward or requires a lot of force to control the pan, it might be worth reconsidering how you’re using it.
Proper handling ensures the cookware lasts longer and remains safe.
When to Seek Professional Help or Replace Cookware
While most loose handles are fixable at home, there are situations where it’s best to seek professional help or consider replacing your cookware. If you have riveted handles that have come loose, or if the metal around the attachment point on your pot or pan is cracked or severely damaged, these are usually beyond a simple DIY repair. Attempting to fix these issues without the right tools and expertise could lead to further damage or an unsafe product.
Also, if you’ve tried tightening a screw and it just keeps spinning, indicating stripped threads that you can’t repair, or if the handle itself is cracked or broken, it might be time to invest in new cookware. Safety is paramount in the kitchen, and a wobbly or detached handle can lead to spills, burns, or other accidents.
Irreparable Rivets
As mentioned, riveted handles are designed for permanence. If a rivet loosens, it means the integrity of the fastening has been compromised. Unlike screws, rivets cannot simply be tightened.
Repairing rivets usually involves specialized tools to either peen (hammer) the rivet back into shape or to replace the entire rivet, which requires precise drilling and the correct size replacement rivet. For most home cooks, this level of repair is not feasible.
If your cookware has riveted handles that have become loose, the safest and most practical course of action is often to replace the item. This is particularly true for items like chef’s knives, where a loose handle can be very dangerous. While some high-end knives can be professionally re-handled, for everyday pots and pans, replacement is usually the best option.
Signs of Compromised Rivets
A compromised rivet might show visible signs of wear, such as flattening or thinning at the edges where it attaches to the handle and pot. You might also see a small gap forming between the handle and the pot body, even when the handle is held firmly. If you can visibly see the rivet shaft shifting or if the handle has significant play despite the rivet appearing intact, it’s a sign that the metal around the rivet holes may have enlarged or worn down.
This indicates that the secure connection is no longer reliable.
Sometimes, a rivet might appear to be holding, but if you wiggle the handle vigorously, you can still detect movement at the rivet point. This subtle movement, if persistent, can eventually lead to a complete failure of the attachment. It’s like a tiny crack in a dam; it might not seem like much, but it can lead to a much bigger problem.
Stripped Threads and Damaged Materials
If you’ve tried to tighten a screw and it just spins freely, the threads are stripped. This is a common issue, and as discussed, it can sometimes be fixed with thread repair kits or slightly larger screws. However, if the material where the screw threads into is also badly damaged—for example, if a plastic handle has cracked around the screw hole, or the metal ferrule on the pot is severely deformed—then the entire attachment point may be compromised.
In such cases, even a repair kit might not provide a lasting or safe solution.
Similarly, if the handle material itself is cracked, warped, or melting (in the case of some plastics exposed to excessive heat), it might be unsafe to continue using, regardless of whether the handle is loose. A cracked handle can break unexpectedly, leading to accidents. Prioritize safety; if the handle is structurally compromised, it’s time for a replacement.
When Replacement is the Best Option
Deciding when to replace cookware is a practical consideration. If the cost and effort of repairing a loose handle seem disproportionate to the value or condition of the cookware, replacement might be more sensible. For inexpensive or older pans where the handle is severely damaged or the attachment is beyond simple repair, buying new cookware is often the most cost-effective and safest choice.
High-quality cookware, however, might be worth investing in professional repair services if the damage is significant.
Consider the overall condition of the pan as well. If the non-stick coating is worn off, the metal is warped, or there are other signs of wear and tear, a loose handle might just be the final straw. It’s a good opportunity to upgrade your kitchen tools.
Look for cookware that is well-constructed and has secure handle attachments from the start.
Frequently Asked Questions of Why Cookware Handles Become Loose
How often should I check my cookware handles for looseness?
It’s a good idea to give your cookware handles a quick wiggle check every few months, or after a particularly intense cooking session. If you notice any slight wobble, address it sooner rather than later.
Can I use super glue to fix a loose handle?
While tempting, super glue is generally not recommended for cookware handles. It might not withstand the heat or the stress of cooking, and it can make future repairs more difficult.
My pan handle is made of wood. Can I tighten it?
Yes, most wooden handles are attached with screws. Ensure the pan is cool, and use the appropriate screwdriver to tighten it clockwise. Be careful not to overtighten, as this can damage the wood.
Final Thoughts
Seeing a wobbly handle on your cookware might seem like a frustrating problem, but as we’ve explored, it’s a very common issue with straightforward solutions. The main culprits are the natural expansion and contraction of metal due to heat changes and the effects of washing. For most everyday pots and pans, a simple screw is the part that loosens, and a basic screwdriver is the tool you need.
Remembering to always let your cookware cool completely before attempting any fixes is key, along with using the right size screwdriver and turning it clockwise to tighten.
Preventative care is also a big help. Hand washing, drying thoroughly after each use, and storing your cookware carefully can go a long way in keeping those handles secure. Be mindful of how you lift and carry your pans, especially when they’re full and heavy, by supporting the base.
For handles attached with rivets, or if you encounter stripped threads that you can’t easily repair, it might be time to consider if replacement is the best and safest option. With a little attention and the right approach, you can keep your favorite kitchen tools in good working order for a long time.