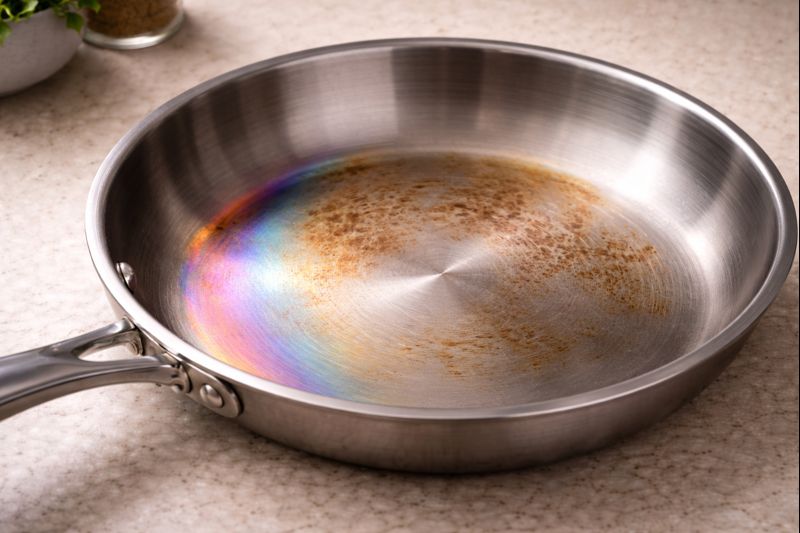
Discoloration on stainless steel pans is caused by overheating, which creates heat-tint colours, and by mineral deposits left behind from water or food residue. Oil polymerisation and high heat can also leave rainbow hues or brown stains without damaging the pan’s performance.
Seeing weird colors on your shiny stainless steel pans can be a bit of a puzzle, especially when you’re just starting to get comfortable in the kitchen. It’s totally normal to wonder about What Causes Discoloration on Stainless Steel Pans because it happens to almost everyone. Don’t worry, though!
We’ve got a simple, step-by-step plan to help you figure it out and get your pans looking great again. Stick around to learn how to tackle these common kitchen mysteries and keep your cookware in top shape.
Key Takeaways
- You’ll learn about the common things that make stainless steel pans change color.
- We’ll explain how different heat levels can affect your pans.
- Discover how minerals in your water can leave marks.
- Understand the role of cleaning products and methods.
- Find out how to prevent discoloration in the first place.
- Get easy steps to clean off existing discoloration.
Understanding Heat-Related Discoloration on Stainless Steel
One of the most common reasons your stainless steel pans might show unusual colors is due to heat. When you heat stainless steel, especially to high temperatures, the metals within the alloy can react. This reaction is called oxidation, and it’s a natural process.
The shiny surface of your pan is a mix of iron, chromium, and nickel. When these elements get hot enough, they can form new compounds on the surface. These compounds are what you see as colored tints, often blues, yellows, or even browns.
The Science Behind Heat Tints
The specific colors you see are actually a result of thin-film interference. Think of it like an oil slick on water. When light hits these very thin layers of oxidized metal, different wavelengths of light are reflected and interfered with.
This selective reflection is what makes us perceive different colors. The hotter the pan gets, the thicker this oxide layer can become, and the more dramatic the color changes might be. This isn’t rust, and it doesn’t mean your pan is ruined; it’s just a surface-level reaction to heat.
For example, a light straw or yellow color often means the pan reached around 400-500°F (200-260°C). Deeper blues might indicate temperatures closer to 600-700°F (315-370°C). Very dark blues or even purples suggest even higher temperatures, potentially over 800°F (425°C).
- High Heat Exposure: Cooking at very high temperatures for extended periods is a primary culprit. This can cause rapid oxidation of the metal’s surface.
- Uneven Heating: Hot spots on the pan, often from a burner that’s too small or too large, can lead to localized overheating and discoloration. This means some areas get much hotter than others.
- Preheating Too Long: Leaving an empty pan on the heat for too long before adding food can cause it to overheat, leading to these heat tints.
It’s important to remember that stainless steel is quite durable. While these colors can be visually distracting, they typically do not affect the pan’s performance or safety. Many professional chefs accept these heat tints as a natural part of using high-quality cookware regularly.
The key is to manage heat effectively to prevent excessive discoloration and prolong the aesthetic appeal of your pans.
Preventing Heat-Related Stains
Preventing these colors from appearing in the first place is quite straightforward. The most effective method is to control the heat. Always try to use a heat setting that is appropriate for the cooking task.
For searing meats, a medium-high heat is usually sufficient. For simmering sauces, medium or low heat is ideal. Avoid blasting the heat on an empty pan, and when you do preheat, do it for a shorter duration until it’s just warm enough to start cooking.
- Medium Heat is Your Friend: Most cooking tasks don’t require super high heat. Using medium heat on your stovetop is often enough to achieve good results without damaging the pan’s surface.
- Add Food Promptly: Once the pan is warm, add your ingredients. This helps to absorb some of the heat and prevent the metal from getting excessively hot.
- Use the Right Burner Size: Make sure the size of your burner matches the size of your pan’s base. A burner that’s too large can heat the sides of the pan unevenly, leading to hotspots and discoloration.
Understanding how your stove and pans interact is key. Some stovetops heat more intensely than others. Newer induction cooktops, for instance, can heat pans very quickly.
Being mindful of this can help you adjust your cooking habits to be gentler on your stainless steel cookware. You can also perform a water test: heat the pan on medium, then flick a few drops of water onto the surface. If the water sizzles and evaporates instantly, it’s likely too hot.
If it forms beads that dance around, it’s at a good cooking temperature.
Mineral Deposits and Water Stains
Another frequent cause of marks and discoloration on stainless steel pans comes from the water you use. Tap water, especially in certain regions, contains various minerals like calcium and magnesium. When you boil water or cook food in water, these minerals can be left behind on the pan’s surface as the water evaporates.
These deposits usually appear as white or cloudy spots, sometimes with a faint rainbow hue. They are particularly noticeable on the shiny surface of stainless steel.
The Impact of Hard Water
Hard water has a high mineral content. When you wash your pans or cook with it, these minerals cling to the metal. Over time, repeated exposure can build up these deposits, creating a film that can alter the appearance of your pan.
This isn’t harmful in itself, but it can make your pans look dull and stained. It’s similar to how limescale builds up in kettles or on shower heads. These mineral stains are different from heat tints; they are usually more opaque and less iridescent.
- Calcium and Magnesium Buildup: These are the most common minerals found in hard water that cause staining. They leave behind white, chalky residues.
- Residue from Dishwashers: If you wash your stainless steel pans in a dishwasher, especially without a rinse aid, mineral deposits from the drying cycle can also accumulate.
- Boiling Water: When you boil water in a pan and then pour it out, a thin film of minerals is often left behind as the water evaporates.
The intensity of the staining depends on how hard your water is and how often you cook with water or wash your pans. If you notice your pans looking spotty after washing, it’s likely due to these mineral deposits. While they might not look great, they are generally easy to remove with a little effort and the right cleaning solutions.
The key is to address them before they become too stubborn or build up too much.
Cleaning Mineral Stains Effectively
Fortunately, mineral deposits are usually simple to tackle. A mild acid is often the best way to break down these alkaline mineral deposits. White vinegar or lemon juice are excellent, common household items that work well.
You can pour a small amount of vinegar or lemon juice into the pan, enough to cover the stained areas, and let it sit for a few minutes to an hour, depending on the severity of the stain. Then, gently scrub with a non-abrasive sponge and rinse thoroughly. For tougher stains, you can make a paste of baking soda and water, apply it to the stains, let it sit, and then scrub.
Baking soda is a mild abrasive and can help lift the deposits.
- Vinegar Soak: Fill the pan with equal parts white vinegar and water, or use undiluted vinegar for tougher stains. Let it soak for 30 minutes to an hour.
- Lemon Juice Power: Similar to vinegar, lemon juice can be used. Rub a lemon half over the stained areas, or soak the pan in lemon juice.
- Baking Soda Paste: Mix baking soda with a little water to form a paste. Apply it to the stains, let it sit for 15-20 minutes, then gently scrub with a soft cloth or sponge.
After using an acidic cleaner like vinegar or lemon juice, it’s crucial to rinse the pan very well. You want to remove all traces of the acidic cleaner. Then, dry the pan immediately and thoroughly with a soft towel.
This prevents new water spots from forming as the pan air dries. This immediate drying step is a small habit that makes a big difference in keeping stainless steel looking its best. Repeat the process if necessary for stubborn stains.
Food Residues and Cooking Errors
Sometimes, the discoloration you see on your stainless steel pans isn’t from heat or minerals, but from burnt-on food or incorrect cooking methods. When food particles are left behind and then heated up repeatedly, they can carbonize and stick firmly to the pan’s surface. This burnt residue can appear as dark, stubborn marks that are often mistaken for damage to the pan itself.
These can range from light brown splotches to thick, black, almost charred-looking areas.
Burnt-On Food and Sticking
This type of discoloration typically happens when food is cooked at too high a heat, causing it to burn quickly. It can also occur if you don’t use enough cooking oil or fat, allowing food to stick directly to the hot metal. Certain foods, like sugary sauces or proteins that cook quickly, are more prone to burning and leaving residue.
Once this residue is burnt on, it becomes very difficult to remove with standard washing. The repeated heating of these burnt bits can also cause them to harden and bond with the stainless steel, making them seem like a permanent part of the pan.
- Sugary Foods: Sauces containing sugar, like teriyaki or barbecue sauce, can caramelize and burn very easily, leaving dark sticky spots.
- Proteins: Meats and fish, especially when seared at high heat without sufficient oil, can leave behind burnt-on protein residues.
- Low-Fat Cooking: When trying to cook with less fat, food is more likely to stick and burn if the heat isn’t carefully controlled.
It’s easy to get discouraged by these tough stains, but they are usually salvageable. The key is patience and using the right cleaning techniques. Aggressively scraping with metal utensils will only scratch the pan, making the problem worse.
Gentle methods that break down the burnt material are much more effective in the long run. This is where some basic chemistry comes in handy, as certain substances can help loosen the carbonized food.
Restoring Pans with Burnt Residues
To tackle burnt-on food, you often need a combination of soaking, gentle abrasion, and sometimes, a bit of degreasing power. A great first step is to simmer the pan with water and a little dish soap or baking soda. Fill the pan with water, add a tablespoon or two of baking soda, and bring it to a gentle simmer for 10-15 minutes.
This helps to loosen the burnt bits. After simmering, let it cool slightly, then try to gently scrape away the residue with a wooden spoon or a nylon scrub brush. Avoid steel wool or abrasive scouring pads, which can scratch the stainless steel.
- Simmering with Baking Soda: This is a gentle yet effective method to loosen burnt food. The baking soda helps to break down the carbonized particles.
- Deglazing Technique: After cooking, if there are bits stuck to the pan, add a little liquid (like water or broth) to the hot pan and scrape with a wooden spoon to lift the bits. This is a cooking technique that also helps with cleaning.
- Commercial Stainless Steel Cleaners: For very stubborn stains, specialized stainless steel cleaners can be very effective. These are formulated to remove tough residues without damaging the metal. Always follow the product instructions carefully.
Another effective method for tough burns involves using a bit of Bar Keepers Friend, a common cleaner for stainless steel. Make a paste with the powder and water, apply it to the affected areas, and let it sit for a few minutes. Gently scrub with a non-abrasive sponge.
Rinse thoroughly. Bar Keepers Friend contains oxalic acid, which is great at removing rust, tarnish, and burnt-on food. Remember to always test any new cleaner on a small, inconspicuous area of the pan first to ensure it doesn’t cause any unexpected discoloration or damage.
Chemical Reactions and Improper Cleaning
Beyond heat and food, certain cleaning agents or accidental exposure to chemicals can also cause discoloration on stainless steel. Stainless steel is generally resistant to corrosion, but it’s not completely invincible. Some harsh cleaning chemicals, especially those containing chlorine bleach, can react with the metal and cause pitting or staining.
Similarly, leaving acidic or alkaline foods in the pan for very long periods without rinsing can also lead to etching or discoloration.
The Danger of Harsh Chemicals
Chlorine bleach is a common household cleaner, but it’s one of the worst enemies of stainless steel. When bleach comes into contact with stainless steel, especially if it’s left for a while or if the steel has microscopic imperfections, it can cause pitting and dark spots. These spots are often the result of a chemical reaction that compromises the protective chromium oxide layer on the steel’s surface.
This can lead to a form of corrosion. Salt, too, especially when combined with moisture and heat, can be problematic. While a little salt in cooking water is fine, letting large amounts of salt sit on a wet pan surface for extended periods can also lead to pitting.
- Chlorine Bleach: Never use cleaners containing chlorine bleach on your stainless steel pans. They can cause permanent pitting and discoloration.
- Abrasive Scrubbers: Using steel wool or very abrasive scouring pads can scratch the surface of your pans. These scratches can trap food particles and make the pan harder to clean in the future, and can also appear as dull or discolored areas.
- Leaving Food Residues: Allowing acidic foods like tomatoes or lemon juice, or highly alkaline foods, to sit in the pan for hours can etch the surface.
It’s also worth noting that different grades of stainless steel have varying levels of resistance to corrosion and staining. Higher quality stainless steel, often found in professional-grade cookware, is more resilient. However, even the best stainless steel needs to be treated with care to maintain its appearance.
Being mindful of what you use to clean your pans and what you leave in them can prevent many common issues.
Best Practices for Cleaning Stainless Steel
To keep your stainless steel pans looking their best, stick to gentle cleaning methods. After each use, wash the pans with warm, soapy water and a soft sponge or cloth. Rinse thoroughly and dry immediately with a soft towel.
For tougher food residues, as mentioned, try simmering with baking soda or using a mild acid like vinegar. If you must use a stronger cleaner, opt for one specifically designed for stainless steel cookware. Always read the product label to ensure it’s safe for your pans.
Rinsing is always key, no matter what you use for cleaning, to remove any residue.
- Gentle Detergents: Use a mild dish soap and warm water for everyday cleaning. This is usually enough to remove food residues and grease.
- Non-Abrasive Tools: Always use soft sponges, microfiber cloths, or nylon scrub brushes. Avoid abrasive pads or steel wool that can scratch the finish.
- Immediate Drying: After washing, dry your pans completely with a soft towel. This prevents water spots and mineral buildup, keeping them shiny.
When you encounter more stubborn stains, consider using a stainless steel polishing compound. These are designed to restore shine and remove minor imperfections without being overly abrasive. Apply a small amount to a soft cloth and buff the pan in the direction of the metal grain.
Regular care and attention are far more effective than trying to fix severe damage later. By following these simple cleaning routines, you can significantly extend the life and beauty of your stainless steel cookware.
Preventative Measures and Long-Term Care
Keeping your stainless steel pans looking pristine involves more than just cleaning them after use; it’s about adopting a preventative mindset. Thinking ahead about how you cook and clean can save you a lot of trouble down the line. This includes how you store your pans, how you preheat them, and what types of utensils you use.
These small habits contribute greatly to the longevity and appearance of your cookware.
Wise Cooking Habits
The way you approach cooking with stainless steel is foundational to preventing discoloration. This starts with preheating your pan correctly. Instead of blasting the heat and hoping for the best, try a more controlled approach.
For most cooking, a medium heat setting is perfect. Let the pan warm up gradually for a few minutes. You can test the heat by flicking a few drops of water onto the surface; they should sizzle and evaporate.
If they ball up and dance, it’s too hot. Adding your cooking oil or fat once the pan is warm, but not scorching hot, helps create a non-stick barrier.
- Controlled Preheating: Always preheat your pan gradually on medium heat. This allows the metal to expand evenly and reduces the risk of hotspots.
- Use Cooking Fat: Always use a small amount of cooking oil or butter. It creates a lubricant layer that prevents food from sticking and burning onto the pan.
- Avoid Overcrowding: Don’t overcrowd the pan with food. This lowers the pan’s temperature too much, leading to steaming rather than searing, and can cause food to stick and burn unevenly.
Consider the types of utensils you use. Metal utensils, while convenient, can scratch the surface of your stainless steel pans, creating tiny grooves that can trap food and become discolored over time. Opting for silicone, wooden, or nylon utensils will help preserve the smooth finish of your cookware.
If you do need to scrape stuck-on bits, use a wooden spoon, which is less likely to scratch than metal.
Smart Storage and Maintenance
How you store your pans also plays a role in their long-term care. Avoid stacking them directly on top of each other without protection. Pans can scratch each other in storage, and this can lead to dull spots that look like discoloration.
Using pan protectors, dish towels, or even paper towels between stacked pans can prevent this. If you hang your pans, ensure they aren’t banging against each other.
- Protective Layers: When stacking pans, place pan protectors, felt pads, or even paper towels between them to prevent scratching.
- Avoid Metal Utensils: Use wooden, silicone, or nylon utensils when cooking to prevent scratches on the pan’s surface.
- Regular Polishing: Periodically polish your stainless steel pans with a dedicated stainless steel cleaner or a paste of baking soda and water. This helps to remove light tarnish and restore shine.
Investing a little extra time in how you handle your stainless steel cookware can make a big difference. By being mindful of heat control, using the right tools, and cleaning gently and promptly, you can keep your pans looking and performing their best for years to come. This attention to detail ensures that your cookware remains a reliable and attractive part of your kitchen.
Frequently Asked Questions of What Causes Discoloration On Stainless Steel Pans
Will discoloration make my stainless steel pan unsafe to use?
In most cases, no. The common discolorations like heat tints or minor mineral spots are surface-level and do not affect the pan’s safety or its ability to cook food evenly. They are usually cosmetic issues.
Can I use steel wool to clean my stainless steel pans?
It’s best to avoid steel wool. While it might remove tough stains, it can scratch the surface of your stainless steel, leading to more problems down the line and making it harder to clean.
How do I get rid of rainbow-colored stains on my pan?
Rainbow-colored stains are often heat tints or mineral deposits. You can usually remove them by simmering the pan with a mixture of equal parts white vinegar and water for about 15-30 minutes, then scrubbing gently with a soft sponge and rinsing.
Is it normal for new stainless steel pans to have minor marks?
Yes, it’s not uncommon for new stainless steel pans to have very minor scuffs or slight variations in finish from the manufacturing process. These usually disappear with the first few uses and proper cleaning.
Final Thoughts
Seeing those colorful marks or stubborn spots on your stainless steel pans can be a bit concerning, but it’s almost always a sign of normal use rather than damage. We’ve explored how high heat can create beautiful, iridescent shades, how minerals from your water can leave cloudy marks, and how even simple cooking errors like burnt-on food can affect appearance. The good news is that these are all manageable situations.
By understanding that these discolorations are usually just surface changes, you can approach cleaning and maintenance with confidence. The key is to use gentle cleaning tools and mild solutions, and to dry your pans right after washing to prevent water spots from forming. For tougher issues, a little bit of vinegar or baking soda often does the trick.
Don’t be afraid to experiment with these simple, common household items.
Remember, consistency in how you care for your pans makes a huge difference over time. Washing them promptly after use, avoiding harsh chemicals like bleach, and using appropriate heat settings will help maintain their shine and functionality. Think of these colorful marks not as flaws, but as badges of a well-loved kitchen tool.
With a little patience and the right approach, you can easily keep your stainless steel cookware looking great and cooking perfectly for many meals to come.