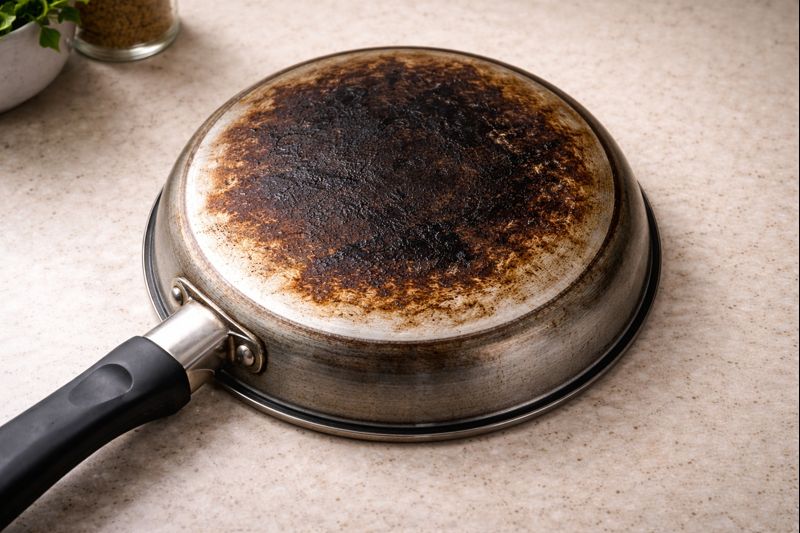
Cookware develops burn marks on the bottom when spilled food, oil, or sugars carbonise on the hot surface, or when pans are repeatedly overheated beyond their intended temperature. Direct flame contact, high heat on empty pans, and uneven burners can also cause persistent scorching and discoloration over time.
It can be frustrating when your favorite pots and pans get those stubborn burn marks on the bottom. If you’re new to cooking, figuring out Why Cookware Develops Burn Marks on the Bottom might seem like a tricky puzzle. Don’t worry, it’s a common issue, and we’re here to make it simple.
We’ll break down exactly what causes these marks and how you can easily prevent them from happening in the first place. Get ready to learn the secrets to keeping your cookware looking great!
Key Takeaways
- You’ll learn about the main reasons food sticks and burns to cookware.
- We will explain the role of heat control and how it affects cooking.
- You will discover how different cooking surfaces react to heat and food.
- Simple cleaning tips will be shared to help remove existing burn marks.
- You’ll get practical advice on how to avoid burn marks on your cookware in the future.
- The importance of using the right amount of cooking oil or fat will be highlighted.
Understanding Heat and Food Interactions
The core reason Why Cookware Develops Burn Marks on the Bottom often comes down to how heat interacts with food and the cooking surface. When heat is too high, or when certain foods are left unattended, they can break down and stick. This sticking then leads to burning. It’s like a chain reaction where one small issue can escalate.
The Science of Sticking
When you cook, food molecules can form bonds with the surface of your cookware. This happens especially when there isn’t enough lubrication, like oil or water. Proteins in food, for example, can denature and create sticky surfaces. If the pan is too hot, these bonds form very quickly and strongly, making it hard to release the food. This is the first step towards a burned-on mess.
Think about cooking an egg without any butter or oil in a cold pan. The egg white will likely stick right away. Now imagine doing that in a pan that’s scorching hot.
The egg would probably cook too fast and fuse to the pan surface almost instantly.
- Protein Denaturation: Proteins, found in meat, eggs, and dairy, can change shape and become sticky when heated. This is a natural process, but in cookware, it can lead to sticking if not managed.
- Maillard Reaction: This is a chemical reaction between amino acids and reducing sugars that gives browned food its distinctive flavor and color. While delicious in controlled cooking, uncontrolled Maillard reactions can lead to burning when sugars caramelize too much and char.
- Carbohydrate Starchiness: Starches in foods like potatoes or pasta can also become sticky, especially if cooked at high temperatures or if the cooking liquid evaporates too quickly.
The Role of Temperature
Heat management is absolutely key to preventing burn marks. When a pan gets too hot, food can burn on the outside before it’s cooked through on the inside. This creates a hard, blackened layer that’s difficult to remove. It’s about finding that sweet spot of heat.
Too little heat means food might simmer and cook slowly, which is fine for some dishes, but it doesn’t usually cause burning. The real enemy is excessive heat that causes rapid chemical changes leading to sticking and charring.
Many beginners turn their stovetop up too high, thinking it will cook food faster. However, this often backfires, leading to burnt exteriors and raw insides, not to mention the dreaded burn marks on the pan bottom.
Surface Material Matters
The type of material your cookware is made from plays a big role in Why Cookware Develops Burn Marks on the Bottom. Different metals and coatings conduct and retain heat differently.
For instance, thin, cheap pans might have hot spots where heat concentrates, causing uneven cooking and burning. Heavier pans with better heat distribution are generally more forgiving.
- Stainless Steel: This is a popular choice but can be prone to sticking and burning if not preheated correctly or if food is added to a cold pan. Its layers are designed for even heating, but it doesn’t have a non-stick coating.
- Cast Iron: This material holds heat exceptionally well and distributes it evenly once heated. However, it requires seasoning to create a natural non-stick surface, and if overheated or not seasoned properly, food can stick and burn.
- Non-Stick Coatings (e.g., Teflon): These are designed to prevent sticking. However, their coatings can be damaged by very high heat or abrasive cleaning, and once the coating is compromised, they become more prone to burning.
- Copper: Copper heats up very quickly and evenly. While this is great for control, it also means it can go from perfectly cooked to burnt very fast if you’re not careful with the heat.
Common Culprits Behind Burn Marks
Let’s look at the specific actions that lead to those annoying burn marks. Often, it’s a combination of things that go wrong in the kitchen.
Insufficient Fat or Oil
This is one of the most frequent causes of food sticking and burning. Fat and oil act as a barrier between the food and the hot pan. Without enough of this barrier, the food molecules have a direct line to bond with the cookware surface.
When you’re frying or sautéing, a thin, even layer of oil is essential. For delicate foods like fish or eggs, you might need a bit more. If the oil burns off during cooking, it’s a sign that the pan is too hot, and you’ll need to reduce the heat and possibly add more oil.
Consider making pancakes. If you don’t add enough batter to a well-oiled pan, the edges might cook too fast and burn while the center is still raw. The batter sticks because there’s no protective layer for the sugars and proteins to cook on.
Sample Scenario: The Stuck Scramble
- You decide to make scrambled eggs for breakfast.
- You heat your frying pan on medium-high heat.
- You add a tiny drop of oil, just enough to coat the bottom.
- You crack the eggs directly into the hot pan without letting the oil heat up properly.
- The eggs immediately start to stick to the pan as they cook.
- Within minutes, the bottom of the pan has dark brown, burnt-on egg residue.
Overheating the Pan
Turning the heat up too high is a recipe for disaster, both for your food and your cookware. When a pan gets excessively hot, oils can smoke and burn, and food sugars can caramelize and then char very quickly.
This intense heat can warp thinner pans and damage the non-stick coatings on others. Even with durable materials like stainless steel, a super hot pan can cause food to seize and burn almost instantly.
It’s often better to start with medium heat and gradually increase it if needed. Preheating your pan properly is important, but there’s a difference between a properly preheated pan and a scorching hot one.
Leaving Food Unattended
When you’re cooking, especially on higher heat, it’s important to stay present. Food can go from perfectly cooked to burnt in a matter of seconds. If you step away to answer the phone or check emails, you might come back to a burnt mess.
This is particularly true for sugary sauces, fried foods, or dishes with a lot of oil. These ingredients cook very quickly and are prone to burning if left to their own devices.
Food Residue and Debris
If you don’t clean your cookware thoroughly after each use, small bits of food can get left behind. When you use the pan again, these tiny remnants heat up, stick, and burn onto the surface.
This is why a good scrub after cooking is so important. Even tiny specks can become the starting point for a stubborn burn mark the next time you cook.
Preventing Burn Marks: Practical Steps
The good news is that preventing burn marks is quite achievable with a few simple habits. It’s all about being mindful during the cooking process.
Mastering Heat Control
This is probably the most critical skill for avoiding burnt pans. Learn to use your stove’s settings effectively. Most cooking can be done on medium or medium-low heat. High heat is usually only needed for searing or quickly boiling liquids.
If your oil is smoking, your pan is too hot. If food is cooking too quickly and looks like it’s about to burn, turn the heat down immediately. It’s better to cook food a little slower than to risk burning it and damaging your cookware.
A handy trick is to test the heat by flicking a tiny drop of water into the pan. If it sizzles and evaporates instantly, the pan is too hot. If it just sits there, it’s too cold.
If it dances around in little beads before evaporating, the heat is about right for adding oil and food.
Using the Right Amount of Lubrication
Don’t be stingy with your cooking oil, butter, or other fats. A thin, even layer is usually sufficient. For foods that are known to stick, like eggs or rice, you might want to add a little extra.
Ensure the fat is heated before adding your food. For oils, this means waiting until they shimmer slightly. For butter, it means waiting until it melts and stops foaming.
Using cooking spray is another option, providing a fine mist of oil that coats the pan surface well. However, some cooking sprays can leave a residue over time, so check your cookware manufacturer’s recommendations.
Key Lubrication Guidelines
- For Sautéing and Frying: Use about 1-2 tablespoons of oil or butter, enough to coat the bottom of the pan.
- For Delicate Foods (Eggs, Fish): Consider a slightly more generous amount, 2-3 tablespoons, to ensure a non-stick surface.
- For Baking/Roasting: If using a pan for baking (e.g., cookies), greasing and flouring or using parchment paper prevents sticking.
- Avoid Burned Fat: If your oil starts to smoke or turn dark brown, it’s burned. Remove the pan from the heat, wipe it out, and start again with fresh fat and lower heat.
Preheating Properly
Preheating your pan before adding ingredients is essential. This allows the metal to expand slightly and creates a more even cooking surface. However, preheating needs to be done correctly.
Place your pan on the stove and let it heat up for a minute or two over medium heat before adding oil. Once the oil is in, let it heat up for another minute until it shimmers or flows easily. Then add your food.
This controlled preheating prevents food from sticking instantly to a cold surface or burning on a pan that’s already too hot.
Stirring and Flipping
Frequent movement of food in the pan can prevent it from sitting in one spot for too long and sticking. Stirring, flipping, or tossing food regularly helps ensure even cooking and prevents localized burning.
For stir-fries, constant movement is the name of the game. For pan-searing, let the food cook undisturbed for the initial time to get a good crust, but then move it to ensure even cooking.
Choosing the Right Cookware
As mentioned earlier, the type of pan you use impacts how easily burn marks develop. Investing in quality cookware with good heat distribution can make a big difference.
Heavy-bottomed pans, like those made from clad stainless steel or thick cast iron, tend to heat more evenly and are less prone to hot spots that cause burning. If you’re frequently struggling with burn marks, consider if your current cookware might be contributing to the problem.
Cookware Material Comparison for Burn Resistance
| Cookware Type | Pros for Burn Prevention | Cons for Burn Prevention |
|---|---|---|
| Non-Stick (Coated) | Excellent at preventing food from sticking initially. | Coating can be damaged by high heat, leading to loss of non-stick properties and eventual burning. Not ideal for high-heat searing. |
| Stainless Steel (Clad) | Good heat distribution, durable. Can develop a good sear without sticking if used correctly. | Food can stick if pan isn’t preheated or oiled properly. Requires learning proper technique. |
| Cast Iron | Excellent heat retention and even distribution once heated. Develops a natural non-stick surface with seasoning. | Requires seasoning and maintenance. Can develop hot spots if not preheated evenly. Food can stick if seasoning is weak. |
| Aluminum (Anodized) | Heats quickly and evenly. Often used in quality non-stick pans. | Can scratch and wear over time. Less durable than stainless steel if not anodized. |
For instance, a cheap, thin aluminum pan might develop a hot spot that causes sugar in a sauce to burn much faster than in a thick, multi-ply stainless steel pan. This uneven heating is a key factor in Why Cookware Develops Burn Marks on the Bottom.
Cleaning Burn Marks: When Prevention Isn’t Enough
Even with the best intentions, sometimes burn marks happen. Thankfully, there are effective ways to clean them without damaging your cookware.
The Baking Soda Paste Method
Baking soda is a mild abrasive and a fantastic natural cleaner. Making a paste with baking soda and water is often enough to lift stubborn burnt-on food.
Here’s how to do it: Mix a few tablespoons of baking soda with just enough water to create a thick paste. Apply this paste to the burnt areas of your cookware. Let it sit for at least 15-30 minutes, or even longer for very tough stains.
Then, use a non-abrasive sponge or cloth to scrub the paste away. Rinse thoroughly.
For very stubborn marks, you can add a little bit of dish soap to the paste or even some white vinegar (but be careful mixing baking soda and vinegar, as they can fizz up vigorously). The goal is to let the paste do the work rather than harsh scrubbing.
- Sprinkle a generous amount of baking soda over the burnt area.
- Add a little water to make a thick paste.
- Let the paste sit for several hours or overnight.
- Gently scrub with a non-abrasive sponge or cloth.
- Rinse and repeat if necessary.
Using Vinegar for Tough Stains
White vinegar is acidic and can help break down burnt-on food, especially sugary residues. You can combine it with baking soda for an extra cleaning boost.
For stovetop cookware, pour a shallow layer of white vinegar into the pan and let it simmer on low heat for a few minutes. Be cautious of the fumes. After simmering, let it cool slightly, then add a tablespoon or two of baking soda.
The mixture will fizz. Use a soft sponge to scrub away the loosened grime. Rinse well.
This method is particularly effective for stainless steel and enamel-coated cookware. For non-stick pans, use vinegar sparingly and avoid harsh scrubbing, as it could damage the coating.
Bar Keepers Friend
This is a popular cleaning product specifically designed for cookware and is very effective against burnt-on food and stains. It contains oxalic acid, which helps to dissolve rust and tough grime.
Follow the instructions on the product packaging carefully. Typically, you’ll make a paste with water and apply it to the affected area. Let it sit for a short while, then scrub gently with a non-abrasive sponge.
Always rinse thoroughly afterward.
It’s important to note that Bar Keepers Friend is a more potent cleaner. Always test it on a small, inconspicuous area first, especially on delicate finishes. For many common issues of Why Cookware Develops Burn Marks on the Bottom, this cleaner is a go-to solution.
Dishwasher vs. Hand Washing
While many modern non-stick and stainless steel pans are labeled as dishwasher safe, hand washing is generally the best way to preserve their condition and prevent burn marks from becoming a recurring issue.
Dishwashers use high heat and harsh detergents, which can degrade non-stick coatings over time and lead to oxidation or dulling of metal surfaces. This can, in turn, make them more prone to sticking and burning in the future.
A quick rinse and gentle scrub with a soft sponge right after cooking is usually all it takes to prevent most food from hardening into a burn mark. This preventative step saves you a lot of effort in the long run.
When to Consider Replacing Cookware
Sometimes, even with the best cleaning efforts, cookware can become too damaged to use effectively. If your pans are deeply scratched, warped, or their non-stick coating is completely gone, it might be time for a replacement.
Using damaged cookware not only makes cooking more difficult and prone to sticking but can also be a health concern if coatings are peeling off into your food. Investing in new, quality cookware can save you a lot of frustration.
Frequently Asked Questions of Why Cookware Develops Burn Marks On The Bottom
Why do my non-stick pans get burn marks so easily?
Non-stick pans are designed for easy food release, but their coatings can be sensitive to very high heat. If the pan overheats, the coating can degrade, making it prone to sticking and burning. Also, if the coating is scratched or worn, food can get underneath and burn.
Is it bad to use a burnt pan?
While you can often clean burn marks off, persistent or deeply ingrained ones can indicate that the pan’s surface is compromised. If cleaning doesn’t restore it, the pan might not heat or cook as evenly, and its non-stick properties might be gone, leading to more sticking and burning.
Can cooking spray cause burn marks?
Not directly, but if cooking spray leaves a sticky residue that isn’t cleaned off thoroughly after each use, this residue can burn onto the pan the next time you cook, contributing to stubborn marks.
What is the best cookware for preventing burns?
Cookware with good, even heat distribution is best. This includes well-made clad stainless steel, thick-gauge aluminum, or well-seasoned cast iron. These materials heat more uniformly, reducing the chance of hot spots that cause localized burning.
Final Thoughts
Keeping your cookware looking its best and free from burn marks boils down to a few key practices. It’s about respecting the heat your pan needs, using enough lubrication to create a barrier, and keeping an eye on your food while it cooks.
When you take the time to preheat correctly and stir your ingredients, you create an environment where food is less likely to stick and burn.
Even when accidents happen, simple cleaning methods like a baking soda paste can often bring your pans back to their former glory. By paying attention to these details, you’ll not only keep your kitchen tools in great shape but also enjoy a smoother, more pleasant cooking experience every time you step up to the stove.