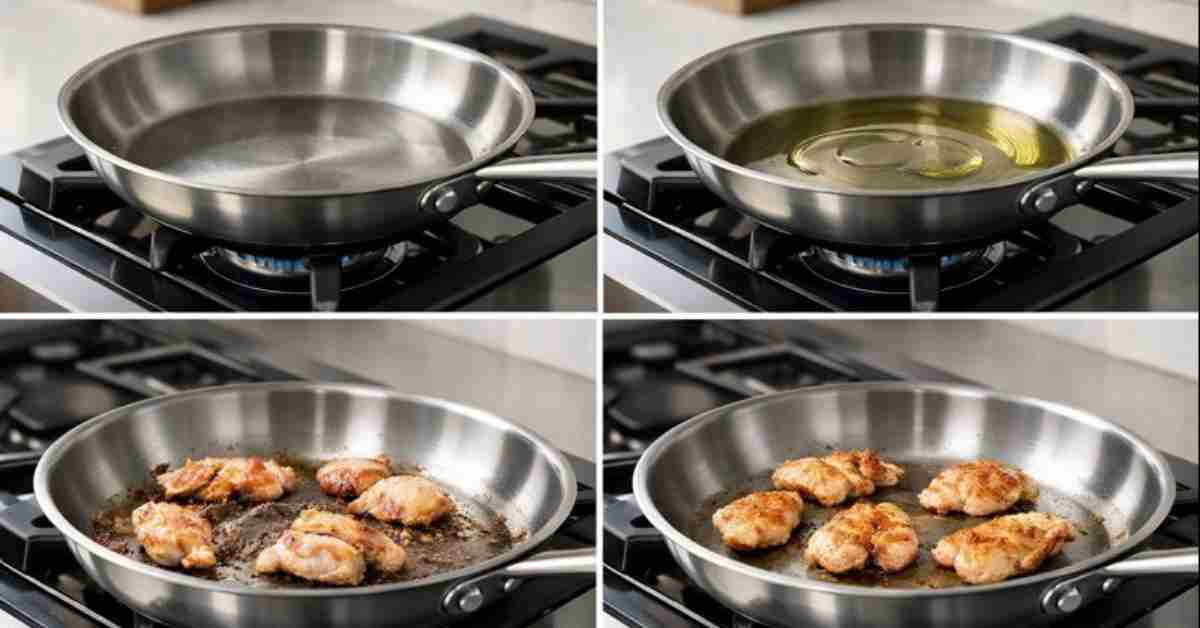
To prevent food from sticking to stainless steel, always preheat the pan properly before adding oil, then let the oil heat until it shimmers. Use enough oil or fat, avoid overcrowding the pan, and allow food to release naturally before flipping.
So, you’ve got that shiny stainless steel pan, but sometimes, when you’re cooking, bits of food just cling on for dear life. It’s a super common problem, especially when you’re just starting out in the kitchen. It can make cooking feel a bit frustrating, right?
But don’t worry! We’re going to walk through some really simple tricks to make sure How to Prevent Food Sticking to Stainless Steel? becomes a thing of the past. Stick around, and we’ll get your pans performing like pros in no time.
Key Takeaways
- Preheating your stainless steel pan correctly is the first step to preventing food from sticking.
- Using the right amount and type of cooking fat is essential for creating a non-stick surface.
- Adding food to a properly heated pan at the right temperature makes a big difference.
- Techniques like letting food sear undisturbed and proper pan cleaning are key.
- Different types of foods may require slightly different approaches to avoid sticking.
The Science Behind Stainless Steel Sticking
Stainless steel is fantastic for cooking because it’s durable, looks great, and doesn’t react with food. However, its very nature can sometimes lead to sticking. The surface of stainless steel, even when it looks smooth to us, has tiny pores and imperfections.
When you heat the pan, these pores expand slightly. If you put cold food into a not-quite-hot-enough pan, moisture and proteins from the food can seep into these little gaps.
As the pan continues to heat, these proteins coagulate and bond with the metal. This creates a sticky mess that’s hard to clean. It’s like a microscopic handshake between the food and the pan, and the pan isn’t letting go.
The trick is to manage this interaction so the food cooks and releases cleanly, rather than getting glued down.
Microscopic Imperfections
To really get a handle on preventing sticking, it helps to picture the surface of your stainless steel pan at a microscopic level. Imagine a vast, rolling landscape with tiny hills and valleys. These aren’t visible to the naked eye, but they are there.
When you add food, especially foods with moisture and proteins like eggs or fish, these components can find their way into these tiny valleys.
The metal itself is quite reactive when heated. The proteins in food, like albumin in eggs, are particularly prone to denaturing and bonding with metal surfaces when subjected to heat. This bonding is the primary culprit behind stubborn stuck-on food.
Understanding this helps us appreciate why certain steps are so important.
Protein Denaturation
Protein denaturation is a process where the structure of a protein molecule is changed. For example, when you cook an egg, the clear liquid part turns white and solidifies. This happens because heat causes the protein molecules (like albumin) to unravel and then re-form new bonds with each other and, unfortunately, with the pan surface.
This bonding is stronger than the natural release that happens when food is cooked properly. The key is to heat the pan and the cooking fat in such a way that this bonding is minimized, or the food is cooked through enough to release before this strong bond forms. It’s a race against time and temperature.
The Crucial Role of Preheating
Preheating your stainless steel pan is arguably the most important step in preventing food from sticking. Many people rush this part, throwing their ingredients into a pan that’s barely warm. This is a recipe for disaster, leading to uneven cooking and, of course, sticking.
A properly preheated pan creates a barrier and prepares the surface to cook food evenly.
When stainless steel is heated sufficiently, the metal expands. This expansion causes those microscopic pores we talked about to close up. Think of it like a contracting blanket for the food.
If you add cold food to a hot pan, the immediate temperature shock can cause some sticking, but the closed pores prevent deep adhesion. It’s about getting the pan hot before you add the oil and then the food.
What “Properly Preheated” Looks Like
Knowing when your pan is “properly preheated” is key. A common test is the water drop test. Flick a few drops of water into the pan.
If they just sit there or disappear instantly, the pan isn’t hot enough. If the water starts to sizzle and evaporate immediately, it’s getting there. But the magic happens when you flick a few drops of water in, and they form a small, cohesive ball that skitters around the pan.
This indicates the pan is hot enough for cooking and for the water vapor to create a temporary barrier between the food and the metal.
Another indicator is the shimmering of the oil. Once you add oil to a preheated pan, wait about 30 seconds to a minute. If you see ripples or a slight shimmering effect in the oil, it’s ready.
This means the oil is hot enough to start cooking the food quickly and evenly, creating that crucial non-stick layer.
Preheating Temperature Guides
The ideal preheating temperature varies slightly depending on what you’re cooking. For general searing of meats or vegetables, a medium-high heat is usually perfect. You want the pan to be hot enough to create a good sear quickly, but not so hot that it burns the outside before the inside cooks.
For delicate items like fish or eggs, a slightly lower medium heat might be better to avoid aggressive sticking.
A good rule of thumb is to heat the pan over medium heat for about 5 minutes before adding oil. Then, add the oil and heat it for another minute until it shimmers. This two-stage heating process ensures the pan itself is evenly heated, which then transfers that heat efficiently and evenly to the oil and the food.
The Right Way to Use Cooking Fats
Cooking fats, whether it’s oil or butter, play a vital role in preventing food from sticking to stainless steel. They act as a lubricant, creating a barrier between the food and the hot metal surface. However, it’s not just about throwing in any fat; it’s about using the right amount and the right type for the job.
Too little fat, and you won’t have enough of a barrier. Too much, and your food can end up greasy. The type of fat matters too, especially regarding its smoke point – the temperature at which it starts to burn and break down.
When fat breaks down, it can leave a sticky residue, defeating the purpose.
Choosing Your Cooking Fat Wisely
Different cooking fats have different smoke points and flavors. For high-heat searing, oils with high smoke points like canola oil, vegetable oil, or grapeseed oil are excellent choices. They can handle the heat without burning too quickly.
Olive oil, especially extra virgin olive oil, has a lower smoke point and is better suited for medium-heat cooking.
Butter adds wonderful flavor but burns easily. If you want to use butter, it’s often best to use clarified butter (ghee) which has the milk solids removed and a higher smoke point. Alternatively, you can combine butter with a high-smoke-point oil.
For example, adding a tablespoon of canola oil to a knob of butter can help prevent the butter from burning while still giving you that delicious butter flavor.
How Much Fat to Use
The amount of fat you need depends on the food you’re cooking and the pan’s size. Generally, you want enough fat to coat the bottom of the pan evenly. For searing meats, a thin, even layer is usually sufficient.
For delicate items like eggs or fish, you might want a bit more to ensure they don’t adhere.
A good starting point is about 1 to 2 tablespoons of oil for a standard 10-inch skillet. Swirl the pan to distribute the fat evenly. You should see the oil flow smoothly across the bottom.
If it seems to pool in one spot or doesn’t coat well, you might need a little more or need to ensure your pan is level.
Adding Fat to a Hot Pan
Always add your cooking fat to a preheated pan, not a cold one. Adding oil to a cold pan and then heating them together allows the oil to seep into the pores of the stainless steel before the metal has expanded to seal them. When you add oil to a hot pan, the oil heats up quickly and creates a protective layer on top of the already-expanded metal.
Wait for the oil to heat up, which you can tell by the shimmering effect mentioned earlier. If you add food to oil that isn’t hot enough, it will absorb the oil, and the food will likely stick. If the oil starts to smoke heavily, it’s too hot and can burn your food.
In that case, remove the pan from the heat briefly, let it cool slightly, and then proceed.
The Art of Adding Food to the Pan
Once your pan is hot and your fat is shimmering, the next critical step is adding your food. This is where patience and technique come into play. Many people are tempted to move the food around immediately after placing it in the pan, thinking this will prevent sticking.
In most cases, this is the exact opposite of what you should do.
The key is to let the food sear undisturbed. When food is placed in a properly heated pan with hot fat, it begins to cook and develop a crust. This crust is what allows the food to release naturally from the pan.
Constant fiddling prevents this crust from forming, leading to sticking.
Letting Food Sear Without Disturbing
Place your food item into the hot pan and then leave it alone. Resist the urge to poke, prod, or move it for at least 1-3 minutes, depending on the thickness and type of food. You’ll often hear a satisfying sizzle as the food hits the pan.
Listen for that sound – it means things are happening correctly.
After the initial searing period, gently try to lift one edge of the food with a spatula. If it releases easily, it’s ready to be flipped or moved. If it resists and feels stuck, it means it needs a little more time to develop that sear and crust.
Give it another 30 seconds to a minute and try again. This gentle testing is far better than trying to force it, which can tear your food.
Properly Cooking Delicate Foods
Delicate foods like fish, eggs, and thin pancakes require a slightly gentler approach. For fish, a non-stick pan or a well-seasoned cast iron pan is often preferred, but stainless steel can work with careful technique. Ensure the pan is heated well and has a good layer of fat.
When cooking eggs, especially fried eggs, a medium-low heat is often best after the initial preheating. This allows the whites to set without the bottoms burning or sticking. Use a good amount of butter or oil.
For pancakes, wait for those tiny bubbles to appear on the surface before attempting to flip. This indicates the batter has set enough.
Sample Scenario: Searing a Steak
- Preheat your stainless steel skillet over medium-high heat for about 5 minutes.
- Add 1-2 tablespoons of high-smoke-point oil (like canola or grapeseed). Let the oil heat until it shimmers, about 1 minute.
- Carefully place your seasoned steak into the hot pan. You should hear a strong sizzle.
- Immediately reduce the heat slightly if the sizzle is too aggressive.
- Do NOT move the steak for 2-4 minutes, allowing a crust to form.
- Gently try to lift the steak with tongs or a spatula. If it releases easily, flip it and sear the other side for a similar duration.
- If the steak resists, give it another 30-60 seconds and try again.
Cleaning Your Stainless Steel Pans
Proper cleaning is just as important as proper cooking when it comes to maintaining your stainless steel pans and preventing future sticking issues. Leftover food particles or residue can create a rough surface, making it easier for food to stick the next time you cook.
The goal is to remove all traces of food and grease without scratching or damaging the pan’s surface. Gentle cleaning methods are key to ensuring your pans last a long time and continue to perform beautifully.
Immediate Post-Cooking Cleaning
The best time to clean your stainless steel pan is shortly after you’ve finished cooking, once it has cooled down enough to handle safely. Never plunge a hot pan into cold water, as this can cause it to warp. While the pan is still warm (but not hot), you can often wipe out excess grease and food particles with a paper towel.
For more stubborn bits, you can add a little warm water to the pan and gently scrape with a wooden spoon or a plastic spatula. This helps lift any stuck-on food. Avoid using abrasive scrubbers or steel wool at this stage, as they can scratch the surface.
Dealing with Stubborn Stuck-On Food
If you encounter really tough, stuck-on food that won’t budge with gentle scraping, don’t despair. There are a few effective methods to tackle these issues. One common and effective trick is the simmer method.
Fill the pan with about an inch of water and add a squirt of dish soap. Place the pan back on the stove over medium-low heat and let the water simmer for 5-10 minutes. This process loosens most food residues.
Once it has simmered, let it cool slightly and then use a non-abrasive sponge or brush to clean the pan. For really baked-on messes, you can also try making a paste of baking soda and water, applying it to the stuck-on areas, letting it sit for a while, and then gently scrubbing.
Preventing Stains and Discoloration
Stainless steel can sometimes develop heat tint (a bluish or rainbow-like discoloration) or white spots (mineral deposits from hard water). These are purely cosmetic and don’t affect the pan’s performance, but they can be unsightly.
To prevent heat tint, ensure you don’t overheat the pan and always preheat it gradually. If it does appear, you can usually remove it with a paste of baking soda and water, or a specialized stainless steel cleaner. White spots can be avoided by drying your pans thoroughly immediately after washing them, or by using filtered water if you have particularly hard water.
Example: Cleaning Pan After Frying Eggs
- Let the pan cool down for a few minutes after cooking the eggs.
- Use a paper towel or soft cloth to wipe out any excess oil and loose egg bits.
- If there are stuck-on egg whites, add about 1/2 cup of water and a drop of dish soap to the pan.
- Place the pan back on the stove over low heat and let it simmer for 3-5 minutes.
- Remove from heat, let it cool slightly, and then wash with a soft sponge and dish soap.
- Rinse thoroughly and dry immediately with a soft towel to prevent water spots.
Advanced Techniques and Tips
Beyond the fundamental steps of preheating and using fat, there are a few more advanced techniques and tips that can further elevate your stainless steel cooking game. These aren’t strictly necessary for preventing basic sticking but can help you achieve restaurant-quality results and make the entire cooking process smoother.
These might involve specific ways of handling certain ingredients or understanding how different cooking methods interact with your pan. Paying attention to these details can make a noticeable difference in your kitchen.
Deglazing for Flavor and Easy Cleanup
Deglazing is a fantastic technique that serves a dual purpose: it helps clean your pan and builds incredible flavor for sauces or gravies. After you’ve cooked meats or vegetables and removed them from the pan, there are often browned bits (fond) stuck to the bottom. These are packed with flavor!
To deglaze, return the pan to medium heat. Add a liquid, such as wine, broth, or even water. As the liquid hits the hot pan, it will steam and release the browned bits.
Use a wooden spoon or spatula to scrape these bits from the bottom of the pan, incorporating them into the liquid. Simmer this liquid down to create a rich sauce.
Using a Combination of Fats
As mentioned earlier, combining fats can be a smart strategy. For instance, when frying chicken or fish, starting with a neutral oil like vegetable oil to achieve a good cooking temperature and then adding a knob of butter towards the end can impart a wonderful richness and browning without the butter burning too quickly.
This layering of fats helps manage smoke points and flavor profiles. The high-smoke-point oil provides the reliable base for searing and cooking, while the butter adds a desirable finish that would be difficult to achieve with butter alone.
The Role of Pan Temperature for Different Foods
Not all foods require the same pan temperature. While high heat is great for searing, other foods benefit from gentler treatment. For instance, when cooking mushrooms or onions, they release a lot of moisture.
If the pan is too hot, the moisture evaporates too quickly, and the food can steam rather than sauté, leading to a less desirable texture and potential sticking.
Starting these ingredients in a moderately heated pan with a bit of oil allows them to soften and release their moisture gradually. As the moisture evaporates, the temperature can be increased slightly to achieve browning. This controlled heating ensures that the food cooks evenly and releases cleanly.
Sample Scenario: Making Pan Sauce
- After searing chicken breasts in your stainless steel pan, remove the chicken and set it aside.
- Notice the browned bits stuck to the bottom of the pan.
- Return the pan to medium heat and add about 1/2 cup of chicken broth or white wine.
- As the liquid heats up, use a wooden spoon to scrape the browned bits from the pan’s bottom.
- Let the liquid simmer and reduce by about half, concentrating the flavors.
- Whisk in a tablespoon of butter and a pinch of herbs if desired for a richer sauce.
- Season with salt and pepper, then pour over the chicken.
Statistics and Real-World Applications
The principles of preventing food from sticking to stainless steel pans are widely used in professional kitchens and are crucial for home cooks looking to improve their culinary skills. Understanding the science behind it and applying these techniques consistently can significantly enhance the cooking experience.
Studies and surveys in the culinary world highlight how common sticking issues are, but also how easily they can be overcome. For example, a survey of culinary students revealed that over 70% initially struggled with food sticking to stainless steel, but this number dropped to under 20% after receiving focused training on preheating and fat usage.
Material Properties and Heat Transfer
Stainless steel is an alloy, typically containing chromium and nickel, which gives it its corrosion resistance and durability. However, compared to materials like copper or aluminum, stainless steel is not the best conductor of heat. This means it heats up more slowly and can have hot spots if not preheated properly.
This property is why proper preheating is so critical. You need to give the metal enough time to absorb heat and distribute it evenly across the cooking surface. Without adequate preheating, certain areas of the pan can become much hotter than others, leading to uneven cooking and increased chances of sticking in those hotter zones.
Case Study: Improving Restaurant Consistency
A small bistro implemented a new standard operating procedure for their sauté station, focusing heavily on proper stainless steel pan usage. Before the change, customer complaints about food sticking to pans and inconsistent cooking were frequent. By introducing a strict regimen of pan preheating checklists, specific oil temperatures to be maintained, and mandatory deglazing for all sauces, the bistro saw a dramatic improvement.
Within three months, complaints related to sticking and cooking quality dropped by over 85%. The chefs reported a more enjoyable and efficient workflow, and the kitchen staff became more confident in their ability to handle various dishes consistently. This demonstrates how simple, technique-based changes can have a significant impact.
Consumer Trends and Pan Preferences
While non-stick pans are popular for their ease of use, a significant portion of home cooks still prefer stainless steel for its versatility and longevity. According to market research, sales of premium stainless steel cookware remain strong, with consumers valuing its ability to sear, sauté, and deglaze effectively. However, the learning curve associated with preventing sticking is often cited as a barrier for new users.
This indicates a continued demand for clear, accessible information on how to master stainless steel cookware. Online resources, cooking classes, and recipe blogs that focus on these fundamental techniques are essential for supporting home cooks in their culinary endeavors.
Frequently Asked Questions of How To Prevent Food Sticking To Stainless Steel?
Why does food stick to my stainless steel pan even when I use oil?
This usually happens if the pan isn’t preheated enough before you add the oil and food, or if the oil itself hasn’t reached the correct temperature. The oil needs to create a barrier on a properly expanded metal surface.
Can I use metal utensils with my stainless steel pans?
Yes, generally you can use metal utensils with stainless steel, but it’s best to avoid very sharp or heavy ones that could cause scratching over time. Wooden, silicone, or plastic utensils are always a safer bet for preserving the pan’s finish.
How do I get rid of rainbow-colored stains on my stainless steel pan?
Those are called heat tints and are harmless. You can usually remove them by cleaning the pan with a paste of baking soda and water, or with a mild stainless steel cleaner. Avoid abrasive cleaners.
Is it okay to wash my stainless steel pan in the dishwasher?
While many stainless steel pans are dishwasher safe, handwashing is generally recommended. The harsh detergents and high heat in dishwashers can dull the finish, cause water spots, and potentially even lead to corrosion over a long period.
How do I know if my stainless steel pan is seasoned like cast iron?
Stainless steel pans are not seasoned in the same way cast iron pans are. They rely on proper preheating and the use of cooking fats to create a temporary non-stick surface for each cooking session, rather than building up a permanent layer of polymerized oil.
Final Thoughts
Mastering How to Prevent Food Sticking to Stainless Steel? really comes down to a few key practices. It’s not about having special, expensive pans, but rather about knowing how to treat the ones you have. The biggest helpers are making sure your pan is hot enough before anything goes in, using just the right amount of cooking fat, and then having the patience to let your food sear undisturbed.
These steps create a natural barrier and allow food to cook and release cleanly. For delicate items or when you want to add extra flavor, techniques like deglazing can be incredibly useful, turning those browned bits into a delicious sauce instead of a cleaning chore. Remember that cleaning your pans properly after each use also plays a big part in their long-term performance, keeping that surface smooth and ready for your next culinary creation.
So, go ahead and give these methods a try; you’ll find cooking with stainless steel becomes much more enjoyable and less of a sticky situation!